

Luckily, my fabulous teacher Margaret knew exactly what to do. Had I cut the binding on the bias? Err, no. And of course in that moment, the penny instantly dropped as to why it is called BIAS binding. Doh! I re-did the entire thing, this time cutting my strips on the bias and hey presto, as you can see above, a perfectly flat neck edge! Absolutely amazing. Of course, cutting on the bias gives the material the little bit of 'give' that is required to ease the binding round the curves. So, my dear classroom friend, there is ALWAYS something to learn in this game!
 Speaking of which, did I say that the cable pattern I was doing was quite simple? Um, yes, well ... that is unless you are not concentrating and trying to watch EastEnders at the same time. As I finished a row and glanced down to admire my work, I realised I had 2 unders, instead of an under and an over. Oh dear. At first I thought, don't worry, no-one is going to notice (or care), but the older I get the more of a perfectionist I seem to be becoming and I simply could not continue with a clear conscience. So, 8 rows were frogged and I started again, this time with full concentration!
My other mistake appears to be starting with a front piece, which, ironically, I have never done before, but I wanted to have a crack at the cable. Now that I am past the armhole, the pattern says to continue straight until the front measures 21 rows less than the back. Which is quite hard to do when you haven't done the back yet. Again, doh! Backs are pretty boring though ususally, aren't they, and also big. Ah well, you live and learn, as they say, you live and learn.
So today I think I may get on with the tunic. I am feeling slightly under the weather with a chest cold, so a bit of sewing therapy and lots of hot drinks are in order. Oooh, and I've just remembered that there may be a little Amazon goodness on its way today - hurrah! Of course I shall share it with you when it arrives. Until then, enjoy your day!


Hi
ReplyDeleteThanks for visiting me!!
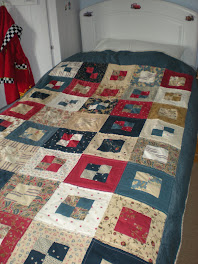
I count myself as a novice sewer...sew person? I'm like your sewing class friend...in awe of other people's makes...including your lovely quilt..wow!!
I fear I may not have the patience to make a big quilt!!!
Love the dinosaur sandwich chopper..I'm a non crust eater..so don't force my boys...they'd love shaped sarnies(even the teens!!)..are they available online do you know???